How Do You Install a Sump Pump in Your Basement?
Water pooling in your basement is a slow-moving problem that gets expensive fast, especially in the East Bay, where clay soil holds moisture against your foundation long after a storm has passed. A sump pump is often the most effective solution—one that experienced DIYers can install themselves.
Cardona Construction has installed sump pump systems for homeowners across Alameda and Contra Costa counties for decades. This guide covers exactly what the job involves and where it tends to go sideways.
What You're Actually Signing Up For
Before the first shovel goes in the ground, it helps to understand the full scope of the work. Installing a sump pump entails:
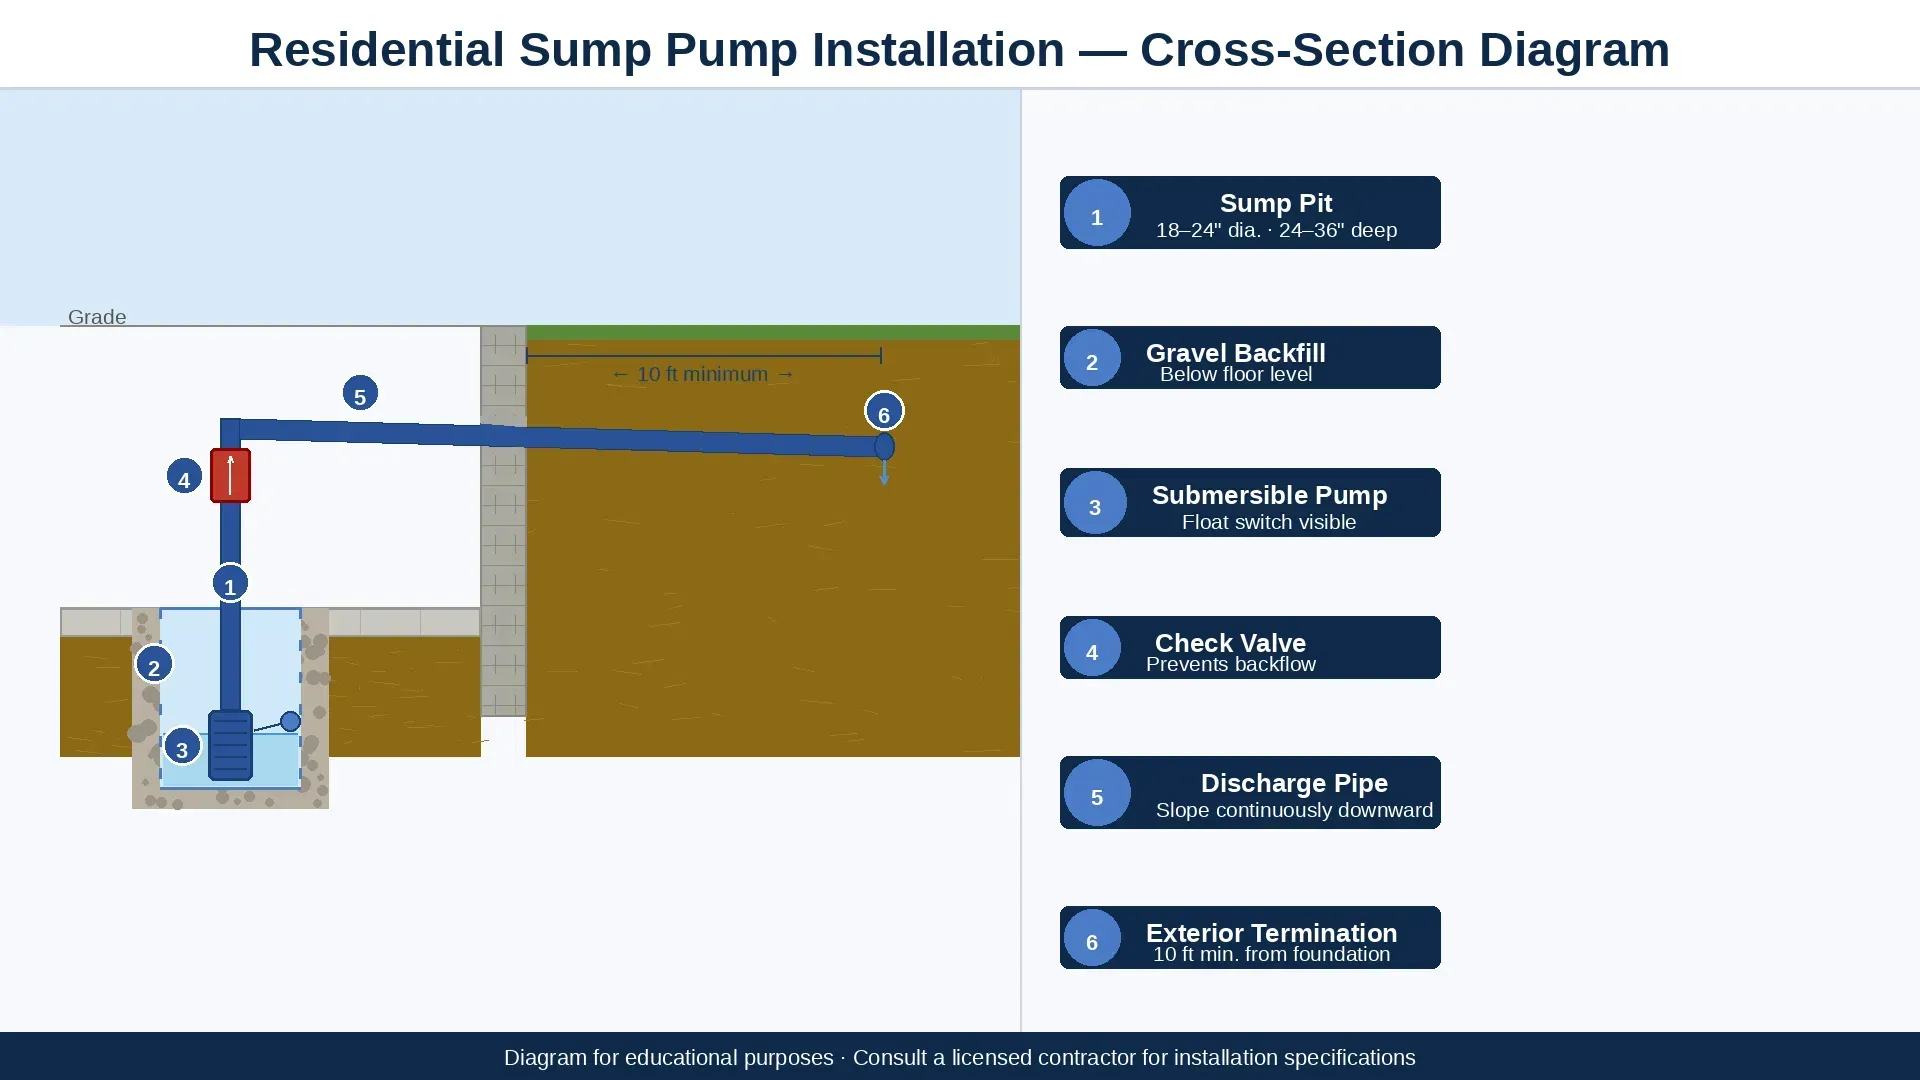
- Excavating a pit in your basement floor, typically 18 to 24 inches in diameter and 24 to 36 inches deep
- Lining it with a perforated sump basin
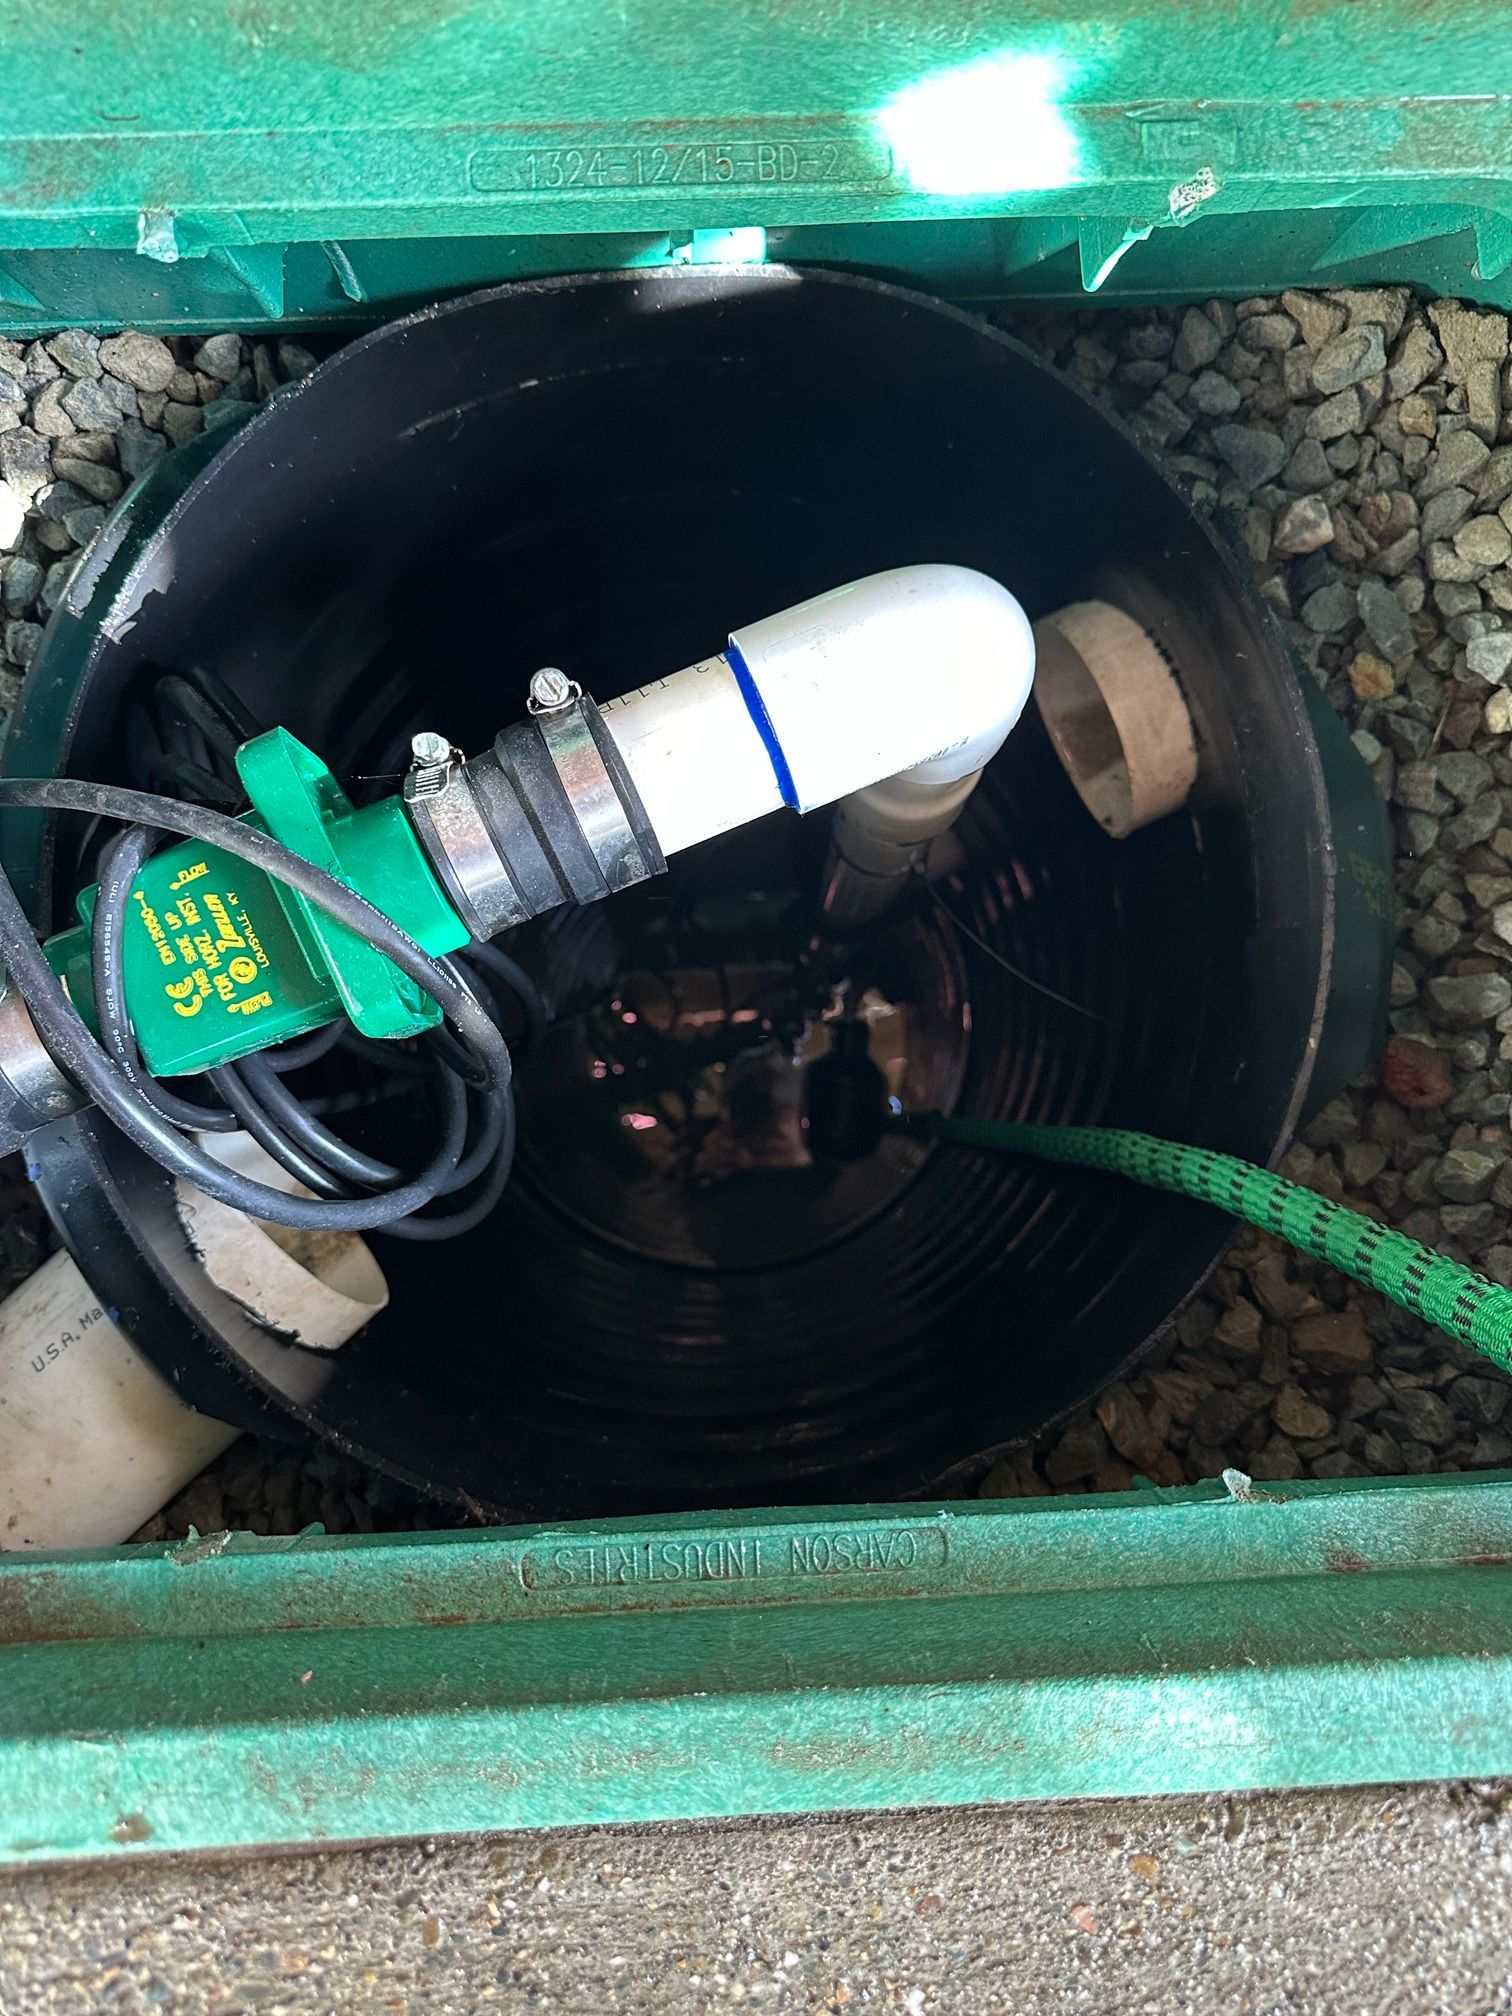
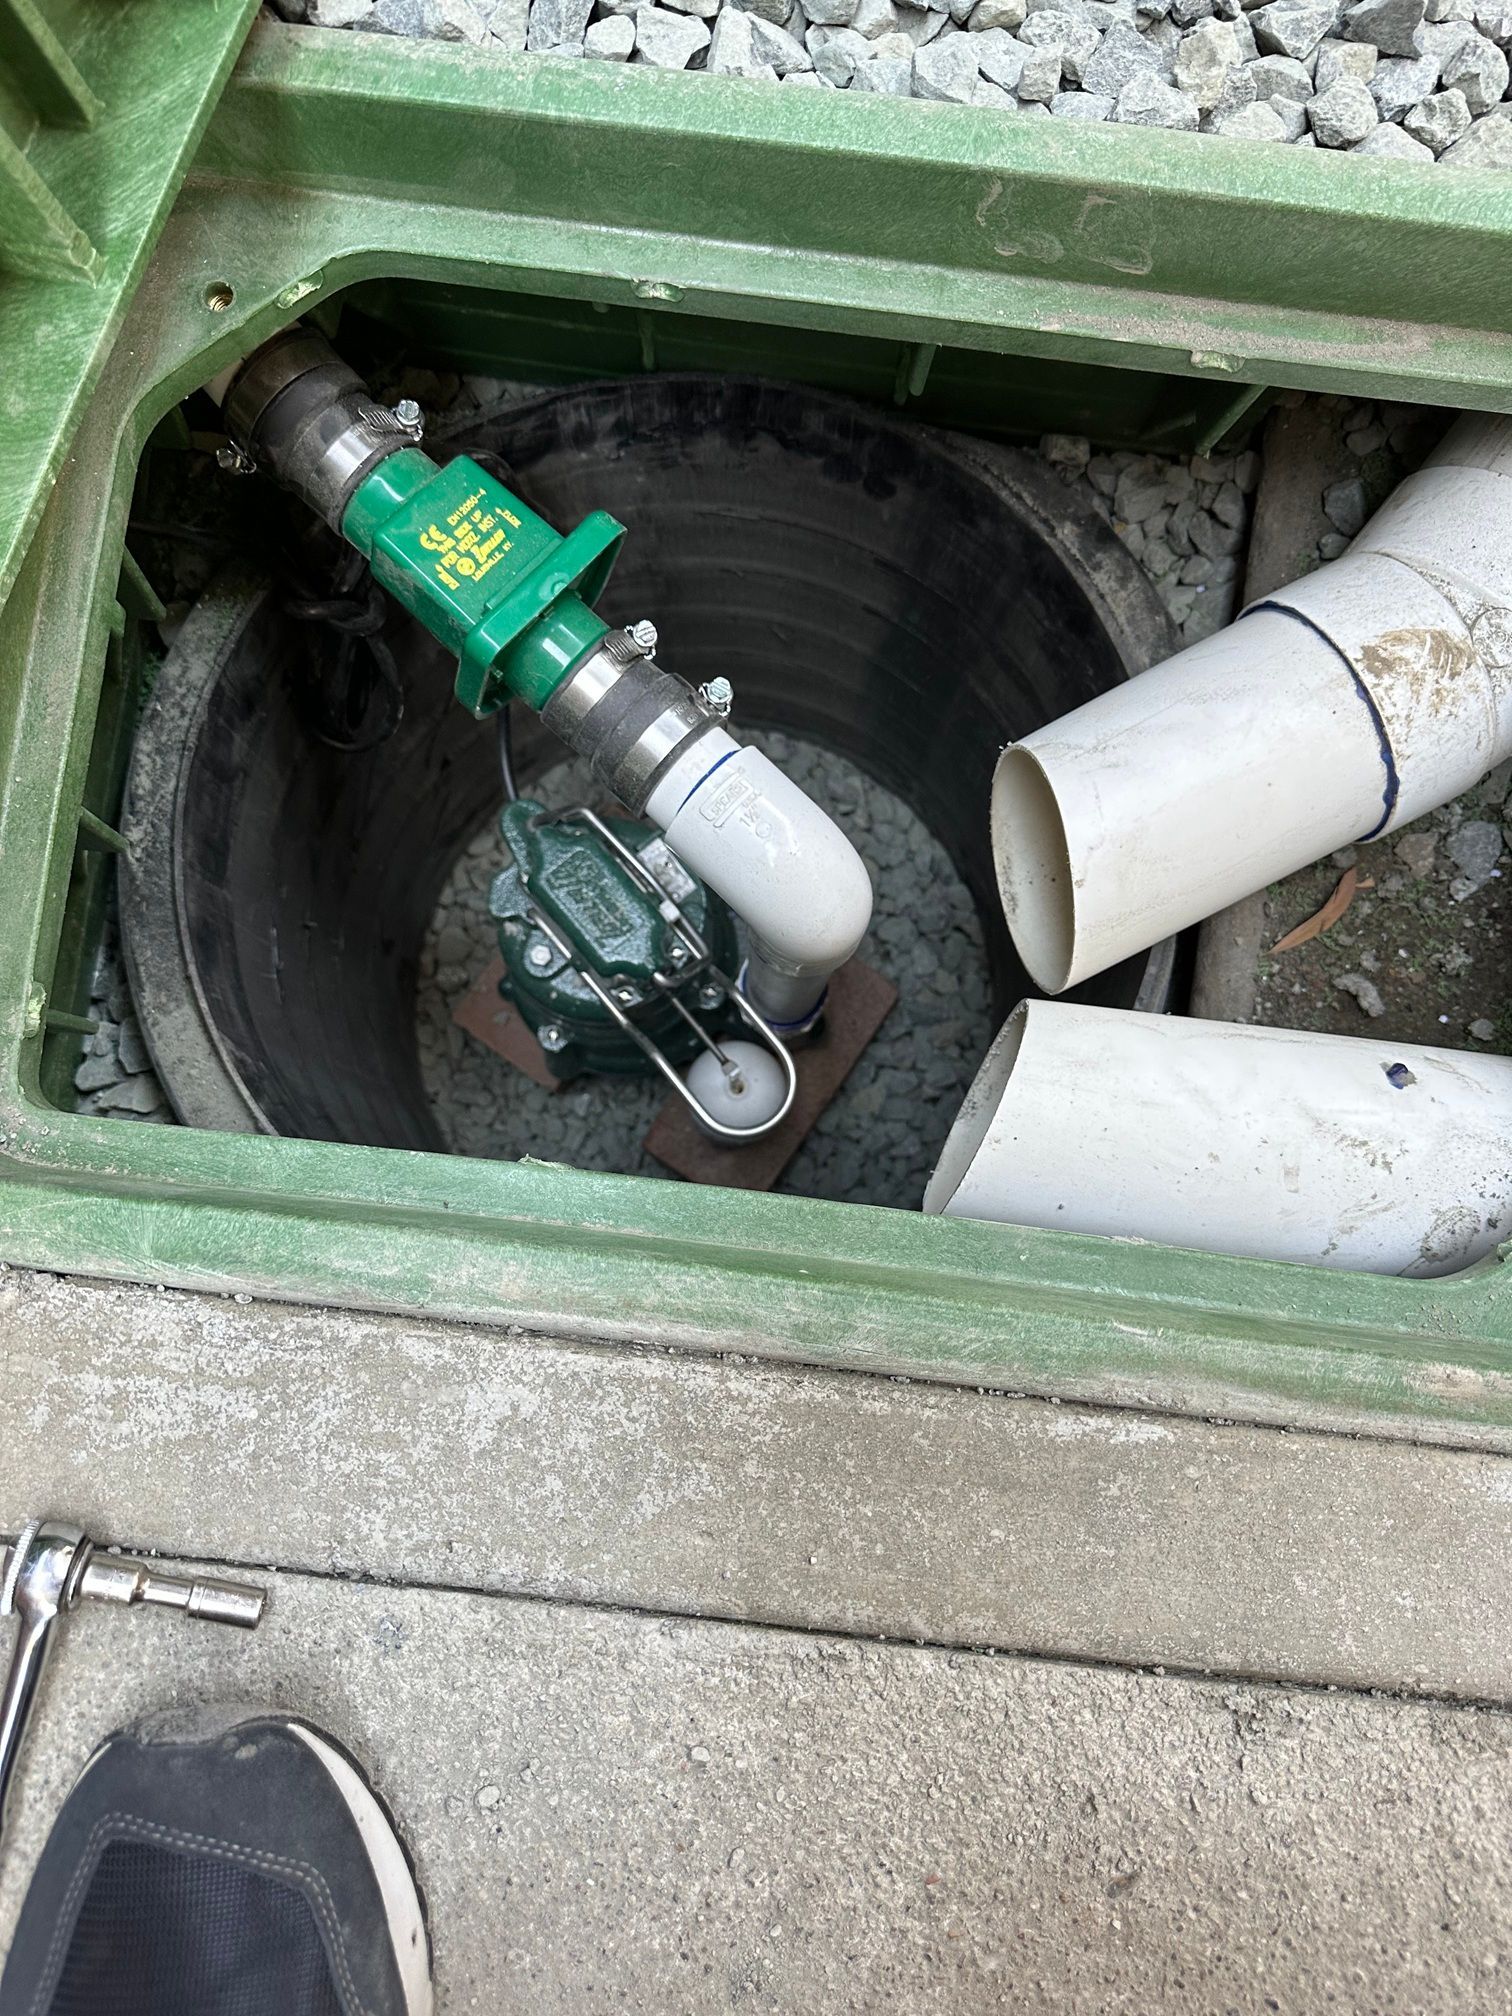
- Connecting a pump
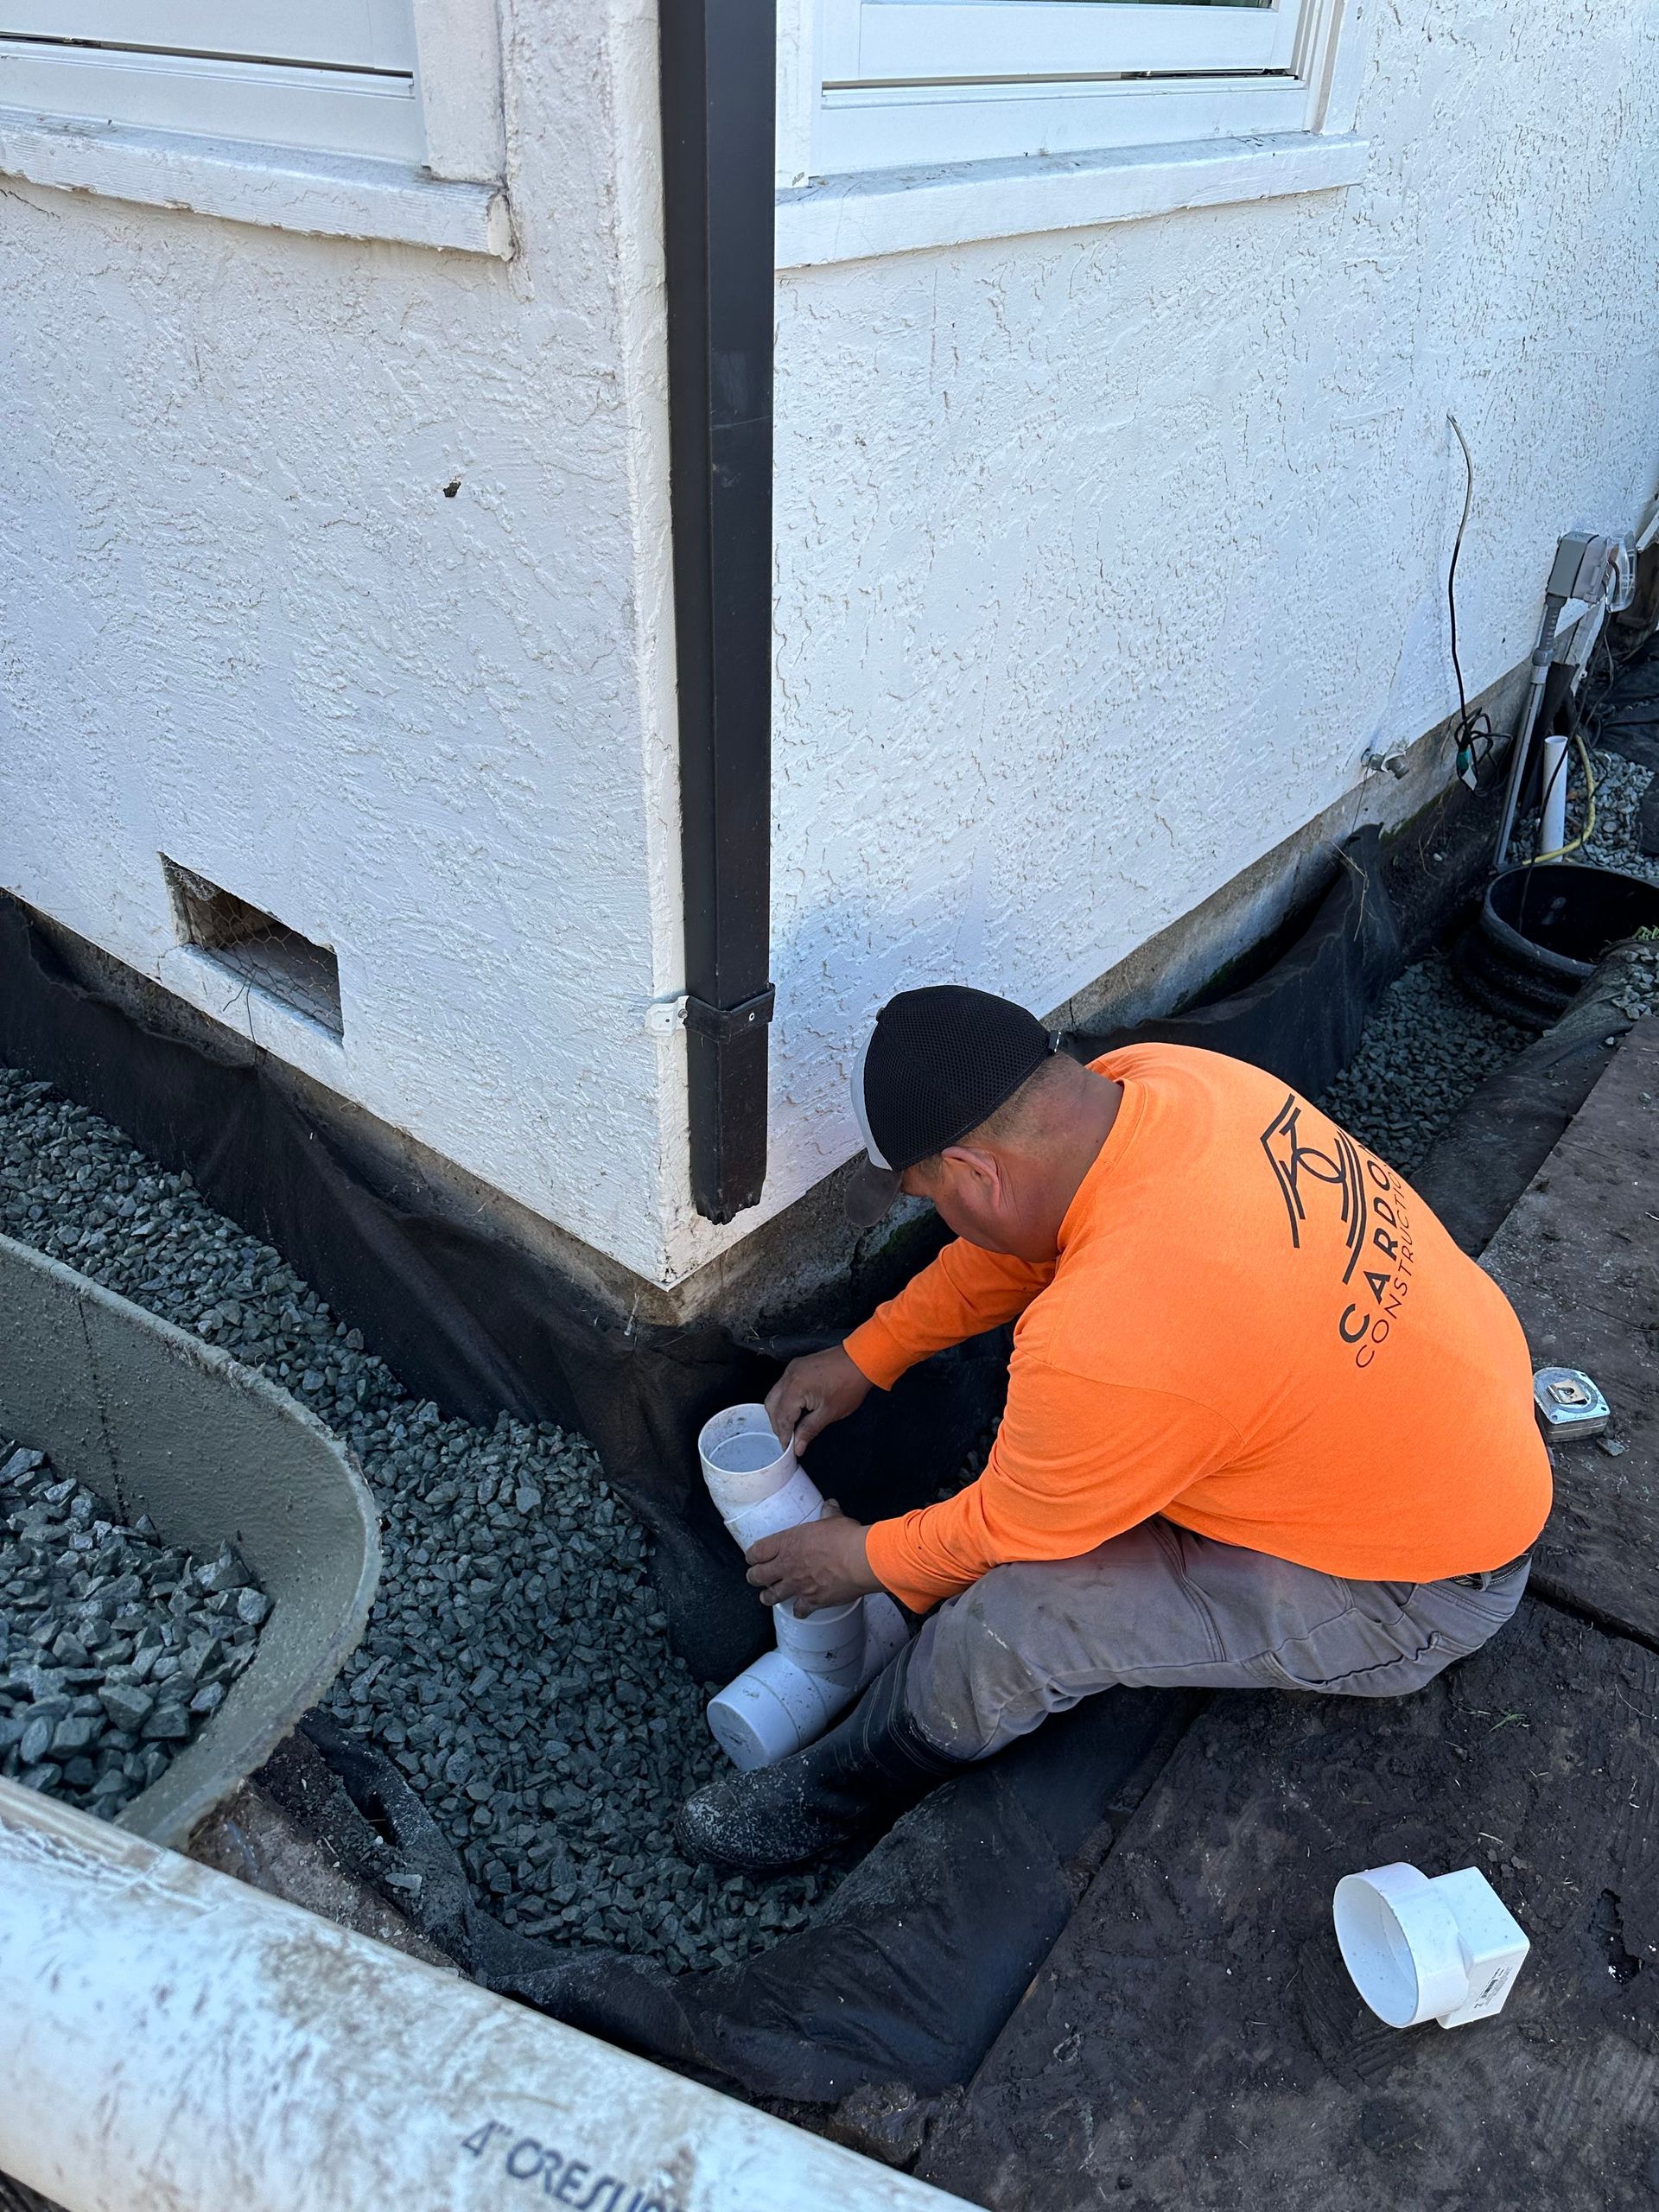
- Running a discharge line to the exterior of your home
- Ensuring the system drains freely above ground, well away from your foundation
In many California municipalities, cutting into a concrete floor to install a sump pit requires a permit. If you're doing this yourself, contact your city building department before you start. A permit protects you at resale, ensures the work meets structural and drainage code requirements, and confirms the installation passes inspection.
What You'll Need
- A rotary hammer to break the concrete
- A wet/dry vacuum
- A submersible pump rated for your water volume
- A perforated sump basin
- PVC discharge pipe
- A check valve
- Waterproof sealant
Budget two to three days working alone.
Step-by-Step: How To Install a Sump Pump
The process follows a clear sequence, and skipping steps tends to create the problems you're trying to solve.
Step 1: Mark and Excavate the Pit
Mark the pit location at the lowest point of your basement. That's where water naturally collects. Break up the concrete with a rotary hammer, then excavate the soil beneath to the target depth. East Bay clay soil is dense and sticky when wet; it won't crumble the way sandy soil does, so plan for the excavation to take longer than instructional videos suggest.
Step 2: Set the Basin and Replace the Concrete
Set the basin so its rim sits flush with or slightly below the floor surface. Backfill around it with gravel, not the clay you removed, so water moves freely into the perforations. Replace the concrete around the basin and let it cure before placing the pump inside.
Step 3: Connect the Pump and Run the Discharge Line
Drop the submersible pump into the lined basin and connect it to the discharge pipe that will carry water away from the foundation. Run the pipe to an exterior wall, slope it continuously downward, and terminate it at least 10 feet from your home's perimeter—further if your yard slopes back toward the house.
The Part Most DIYers Get Wrong
The discharge line and check valve are where most DIY sump pump installations run into problems.
The Check Valve
A check valve is a one-way valve in the discharge pipe that stops water from draining back into the basin when the pump shuts off. Without it, the same water re-enters the pit and triggers the float switch repeatedly—a cycle that burns out motors quickly. A pump that might otherwise last seven to ten years can fail much sooner without a properly installed check valve.
The Termination Point
The termination point is just as critical. In the East Bay's clay-dominant soil, water moves laterally along soil layers rather than straight down. A discharge point that looks adequate on a dry day can channel water back toward the foundation within hours of a storm, especially on properties where the yard slopes toward the house.
Battery Backup
Battery backup is also worth building in from the start. Bay Area atmospheric river events (concentrated storms that dump several inches of rain in under 48 hours) frequently knock out power. A pump that goes offline at peak demand provides no protection.
When To Call a Pro Instead
Some basements are better candidates for professional sump pump installation than others.
- Reinforced basement floors — If your basement floor contains rebar, breaking concrete without damaging the structural grid is a skilled task.
- Wall crack intrusion — If the water is coming through wall cracks rather than floor seepage, a sump pump alone won't solve the underlying problem. Foundation drainage or waterproofing may be the right starting point.
Cardona Construction offers free on-site consultations for East Bay homeowners across Alameda and Contra Costa counties. Our team will walk the property, assess your specific conditions, and explain what the right solution looks like, including permit requirements and whether a professional installation makes more sense than DIY.
Call (925) 642-6349
or visit
cardonaconstruction.com to
schedule your free evaluation.